Revealing content of encrypted SSISDB Environment variables – sp_SSISListEnvironment

You may come to a situation when you need to update a password or some other kind of sensitive information in the SSISDB catalog environment variables. Eg. password has changed etc. The easiest way to ensure that you change the password in all variables/environments would be listing all variables in the SSISDB catalog that have the original value.

SSISDB provides view [catalog].[environment_variables] where you can list all variables and their values. Unfortunately for values which Sensitive flag is set to True, the value is NULL. So this view will not help you.

In case you are db_owner in the SSISDB catalog, you can list the content of the [internal].[environment_variables] table. This table has two columns [value] for normal values and [sensitive_value] for variables which Sensitive flag is set to True. Unfortunately the content of the [sensitive_value] is encrypted.

Revealing sensitive_value

The content of the sensitive_value is encrypted by symmetric key, which is protected by certificate. For each environment in SSISDB there is generated an unique pair of symmetric key and certificate, which secures the content of sensitive variables.

As can be seen on the above image, the symmetric keys are named “MS_Enckey_Env_” + ID of the Environment. Similarly the Certificates are named “MS_Cert_Env_” + ID of the Environment.

As mentioned above. The symmetric key used to encrypt sensitive content is protected by corresponding certificate and each certificate in the SSIDB is protected by the database master key. In case you are db_owner of the SSISDB database, you have CONTROL permission on the Certificate and you can utilize it to decrypt the symmetric key and utilize the symmetric key to decrypt the content of sensitive variables.

Decryption of Sensitive values

To decrypt the sensitive values we can use DECRYPTBYKEY function. But to use that we need to call OPEN SYMMETRIC KEY for each unique symmetric key as the sensitive variables in different environments are protected by different symmetric keys.

The easiest way to decrypt the sensitive values is to utilize DECRYPTBYKEYAUTOCERT. This allows automatic decryption of encrypted data by providing only ID of the certificate which protects the symmetric key.

Thanks to that we can easily write:

SELECT
     [variable_id]
    ,[environment_id]
    ,[name]
    ,[type]
    ,[sensitive]
    ,[value]
    ,[sensitive_value]
    ,DECRYPTBYKEYAUTOCERT(CERT_ID(N'MS_Cert_Env_' + CONVERT(nvarchar(20),  [environment_id])), NULL, [sensitive_value]) AS DecryptedValue
    ,[base_data_type]
FROM [SSISDB].[internal].[environment_variables]

Result:
SSISDBDecrypted

With the above we can easily decrypt the [sensitive_value], however the decrypted content is not directly readable as the decrypted value is returned as binary data. To read the content we need to cast the binary data to appropriate data type. Normally we would need to case the content by the variable type, but SSISDB already has a function to get the content by its type. There is internal function in the catalog for that purposes: [internal].[get_value_by_data_type]. This simplifies revealing of the content.

SELECT
     [variable_id]
    ,[environment_id]
    ,[name]
    ,[type]
    ,[sensitive]
    ,[value]
    ,[sensitive_value]
    ,[internal].[get_value_by_data_type](DECRYPTBYKEYAUTOCERT(CERT_ID(N'MS_Cert_Env_' + CONVERT(nvarchar(20), [environment_id])), NULL, [sensitive_value]), [type]) AS DecryptedValue
    ,[base_data_type]
FROM [SSISDB].[internal].[environment_variables]

SSISDBDecryptedRevealed

sp_SSISListEnvironment

To simplify all the process you can utilize a sp_SSISListEnvironment stored procedure I have published on GitHub in my SQL Scripts repository.

The stored procedure allows listing environment variables and their values from multiple folders/environments and allows easy filtering based on folder/environment/variable names by utilizing wildcards as well it allows searching variables by the content (values).

By a simple call of the stored procedure we can easily receive similar results as above.

[sp_SSISListEnvironment]
    @folder = '%'
    ,@decryptSensitive = 1

Produces:

sp_SSISListEnvironment


For help and detailed usage you can invoke sp_SSISListEnvironment without any parameters.

The scripts grants execution of the stored procedure to the ssis_admin database role, so all ssis_admin members are able to decrypt the sensitive content. You should modify the GRANT in the script to meet your security requirements.

Advertisement

PP.SSIS Custom Components Updated on GitHub

An updated version of custom SSIS Data Flow and Control Flow components were published on GitHub

The update brings seamless Upgrade/Downgrade functionality in VS 2015 and VS 2017 by simple selection of Destination Platform (SSIS 2012 – SSIS 2017).

Data Flow Components

  • Hash Column Transformation
  • Columns To Xml Transformation
  • RegEx Extraction Transformation
  • Row Number Tranformation
  • History Lookup Transformation
  • Lookup Error Aggregation Transformation

Control Flow Components

  • Variables To Xml Task
  • Sleep Task
  • Wait For File Task
  • Wait For Signal Task
  • Wait For Time Task

To build the Components, run Visual Studio as Administrator, than it takes care about registering  the components in GAC as well as copying the dll  as well as Extensions and Upgrade Mappings xml files to appropriate directories.

If Visual Studio is not running as administrator, copying of the above files will fail and you have to manually register the components in GAC as well as you have to copy the Dll files as well as the Extensions and Upgrade Mappings to appropriate DTS directories.

Proper target directories you can find in the Posst Build events settings in individual projects.

Clone / Copy SSIS Catalog Project Configuration – sp_SSISCloneConfiguration GitHub

When you deploy a SSIS project to SSIS Catalog, you have the possibility to Configure the deployed SSIS project so you do not need to pass the parameter execution values each time you are executing the the project packages. You can configure the project to use explicitly provided value or you can use reference to Environment Variables.

This is very useful feature, however if you are using multiple environments, like DEV, TEST, QA, PROD, then you have to handle that configuration in each of the environments. To simplify the process of setting up the parameter, you can scrip the configuration.

The pitfall of scripting the configuration is, that you can do that automatically only during initial setup of the configuration. Once you confirm the configuration values in SSMS, there is no possibility to script-out any existing configuration.

sp_SSISCloneConfiguration

sp_SSISCloneConfiguration is a custom stored procedure which takes care about cloning/copying the configurations among different projects in the same SSISDB catalog as well as it provides functionality to generate reusable scripts to easily re-apply the configurations even among different SSIS Servers.

The stored procedure also takes care about sensitive values re-encryption when those are being cloned as SSISS is using different encryption keys for each project in the SSIS catalog, so simple copy of the encrypted values does not work among different projects.

The stored procedure executes in the context of the AllSchemaOwner database user in the SSISDB, which ensure access to all areas of SSISDB including the needed certificates and symmetric keys to allow scripting. The actual re-application of the configuration script is running in the context of the caller as the Internal SSIS catalog stored procedures for configuring projects needs to be executed in the context of windows credentials.

The create scripts grants EXECUTE permission to the sssis_admin database role in the SSISDB catalog so the SSSIS admins can utilize that stored procedure.

Be careful, anyone with EXECUTE permission on the stored procedure is capable of seeing decrypted sensitive values when printing the script. The script by default grants that permission to ssis_admin database role. If you want to keep that functionality only to sysadmins, remove the GRANT at the end of the script.

The complete source code for the sp_SSISCloneConfiguration is available in my SQL-Scripts project on GitHub in the SSISDB folder.

The syntax of the stored procedure is as follow:

sp_SSISCloneConfiguration
    @sourceFolder             = 'Source Folder Name'
   ,@sourceProject            = 'Source Project Name'
   ,@sourceObject             = 'Optional Source Object Name'
   ,@destinationFolder        = 'Optional Destination Folder Name'
   ,@destinationProject       = 'Optional Destination Project Name'
   ,@printScript              = 1 --Specifies whether only script should be printed
   ,@decryptSensitiveInScript = 1 --Specifies whether sensitive values should be decrypted in script

When the procedure copies the configuration, it applies the source configurations to target. If on the target are any other configuration, those are not touched by the cloning script. In order to have exact configuration, the configurations on target project should be reset.

The generated script is also easily reusable as there are two variables in the beginning for specification of the destination folder and project. By simple modification of those variables the script will apply the configuration on different projects in different folders.

Parameters

The procedure has several parameters where some are required and some optional

The core parameters are @sourceFolder, @sourceProject . The @sourceObject@destinationFolder, @destinationProject, @printScript and @decryptSensistiveInScript are optional.

@source Folder

Specifies the source folder where the source project is located

@sourceProject

Specifies the name of the source project from within source folder to be scripted

@sourceObject

Optional name of the Source Object. It specifies name of the object withing the project which configuration should be scripted. It can point to project name or to individual package names. When provided, then only configurations related to that object are cloned or scripted.

@destinationFolder

Name of the folder of destination project to which the configuration should be cloned. This parameter is optional and if not provided than the source folder name is being used.

@destinationProject

Name of the destination project to which the configuration should be coned. This parameter is optional and if not provided, then the name of the source project is used. If the destination is not provided or matches the source project (both folders and projects are the same), then the @printScript parameter is enforced to 1 and script is always generated.

@printScript

Specifies whether a script should be printed into the output window. If yes, then you simply copy the script from the output window and you can apply it immediatelly on other SSIS Instance.

Default value = 0, this means that the script executes within the SSISDB catalog and automatically clones the configuration unless it is enforced when source matches destination or destination is not provided.

@decryptSensitiveInScript

Specifeis whether sensitive values should be decrypted in the script.If yes, then the values are part of the script in plain-text form, however they are marked sensitive and will be encrypted after applying the script.

If the parameter is 0 (Default), then the sensitive values are not scripted out and instead NULL value is being scripted out. User must then fill those missing values prior execution of the script.

Sample Output

Below is sample script generated by the stored procedure when @printScript=1 and @decryptSensitiveInScript=1

RAISERROR(N'sp_SSISCloneConfiguration v0.10 (2016-12-18) (C) 2016 Pavel Pawlowski', 0, 0) WITH NOWAIT;
RAISERROR(N'=====================================================================', 0, 0) WITH NOWAIT;

DECLARE @destinationFolder nvarchar(128) = N'Test' --Specify Destination Folder Name
DECLARE @destinationProject nvarchar(128) = N'DataLoading' --Specify Destination Project Name

--Checking for destination folder existence
IF NOT EXISTS(SELECT 1 FROM [SSISDB].[catalog].[folders] WHERE [name] = @destinationFolder)
BEGIN
RAISERROR(N'Destination folder [%s] does not exists.', 15, 0, @destinationFolder) WITH NOWAIT;
RETURN;
END
--Checking for destination project existence
IF NOT EXISTS(SELECT 1
FROM [SSISDB].[catalog].[projects] p
INNER JOIN [SSISDB].[catalog].[folders] f ON f.folder_id = p.folder_id
WHERE f.name = @destinationFolder AND p.name = @destinationProject)
BEGIN
RAISERROR(N'Destination project [%s]\[%s] does not exists.', 15, 1, @destinationFolder, @destinationProject) WITH NOWAIT;
RETURN;
END

--Project parameters configuration
DECLARE @var sql_variant

RAISERROR(N'Creating Configuration [SSISDB]\[%s]\[%s]\[DataLoading]\[SourceDB_ConnectionString]', 0, 0, @destinationFolder, @destinationProject) WITH NOWAIT;
EXEC [SSISDB].[catalog].[set_object_parameter_value] @object_type=20, @parameter_name = N'SourceDB_ConnectionString', @object_name = @destinationProject, @folder_name = @destinationFolder, @project_name = @destinationProject, @value_type = 'R', @parameter_value = N'SourceDB_ConnectionString'

RAISERROR(N'Creating Configuration [SSISDB]\[%s]\[%s]\[DataLoading]\[Interval]', 0, 0, @destinationFolder, @destinationProject) WITH NOWAIT;
SET @var = CONVERT(int, N'120');
EXEC [SSISDB].[catalog].[set_object_parameter_value] @object_type=20, @parameter_name = N'Interval', @object_name = @destinationProject, @folder_name = @destinationFolder, @project_name = @destinationProject, @value_type = 'V', @parameter_value = @var

RAISERROR(N'Creating Configuration [SSISDB]\[%s]\[%s]\[DataLoading]\[SecurePassword]', 0, 0, @destinationFolder, @destinationProject) WITH NOWAIT;
SET @var = CONVERT(sql_variant, N'Pa$$w0rd'); --SENSITIVE
EXEC [SSISDB].[catalog].[set_object_parameter_value] @object_type=20, @parameter_name = N'SecurePassword', @object_name = @destinationProject, @folder_name = @destinationFolder, @project_name = @destinationProject, @value_type = 'V', @parameter_value = @var

RAISERROR(N'Creating Configuration [SSISDB]\[%s]\[%s]\[DataLoad.dtsx]\[SourceTableName]', 0, 0, @destinationFolder, @destinationProject) WITH NOWAIT;
SET @var = CONVERT(sql_variant, N'Person');
EXEC [SSISDB].[catalog].[set_object_parameter_value] @object_type=30, @parameter_name = N'SourceTableName', @object_name = N'DataLoad.dtsx', @folder_name = @destinationFolder, @project_name = @destinationProject, @value_type = 'V', @parameter_value = @var
RAISERROR(N'-----------------------------------------------------------------------------', 0, 0) WITH NOWAIT;
RAISERROR(N'There are configurations using Environment varaibles references.', 0, 0) WITH NOWAIT;
RAISERROR(N'DON''T FORGET TO SET ENVIRONMENT REFERENCES for project [%s]\[%s].', 0, 0, @destinationFolder, @destinationProject) WITH NOWAIT
RAISERROR(N'-----------------------------------------------------------------------------', 0, 0) WITH NOWAIT;

Clone / Copy SSIS Server Variables Among Environments – sp_SSISCloneEnvironment on GitHub

You have SSIS projects deployed in the SSISDB catalog. You are using environments and environment variables for passing parameter values to SSIS Executables. This is a very common scenario.

You come to a situation that you need transfer the SSIS projects, environments and varaibles among different SSIS environments (DEV/TEST/QA/PROD). You already have bunch of environment variables defined in one of your environment and you need to transfer those to other environment.

Unfortunately there is no easy way to clone, copy or script the varaibles to transfer them to different environment. If you do not script them during creation in the SSMS, there is no option in SSMS to script them out. If you do not want to type all the varaibles manually again, you have to script those in some way.

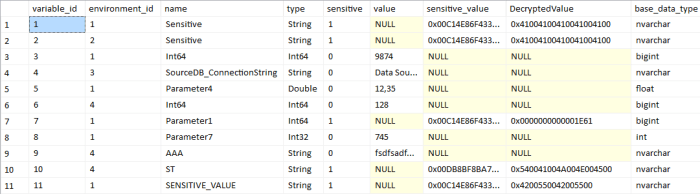
Anyway the proper scripting or clonning is not completely trivial in case sensitive varaible values are being used as SSISDB uses multiple symmetric keys and certificates for the encryption and each Environment in the SSISDB has its own key and corresponding certificate. When cloning such sensitive value, the value needs to be decrypted with the source environment symmetric key and re-encrypted by the destination environment symmetric key.

sp_SSISCloneEnvironment

sp_SSISCloneEnvironment is a custom stored procedure which takes care about cloning the SSSI server variables among different environments in the same SSISDB catalog as well as it allows generate a script, which can be re-applied on even oon other SSIS Instance.

The stored procedure takes care about sensitive values re-encryption by proper certificate when clonning. As mentioned above, SSIS generates a separate symmetric key and certificate for each environment. To ensure proper future functionality, the stored procedure takes care about decryption of the sensitive variables when reading from current environment and re-encryption by proper destination environment symmetric key.

The stored procedure executes in the context of the AllSchemaOwner database user in the SSISDB, which ensure access to all areas of SSISDB including the needed certificates and symmetric keys. Only in areas where it needs to create a folder or environment it switches the context to the caller of the stored procedure as the procedures which are taking care abut the folder and environment creation must be executed under windows credentials.

The create scripts grants EXECUTE permission to the sssis_admin database role in the SSISDB catalog so the SSSIS admins can utilize that stored procedure.

Be carefull, anyone with EXECUTE permission on the stored procedure is capable of seeing decrypted sensitive values when printing the script. The script by default grants that permission to ssis_admin database role. If you want to keep that functionality only to sysadmins, remove the GRANT at the end of the script.

The complete source code for the sp_SSISCloneEnvironment is available in my SQL-Scripts project on GitHub in the SSISDB folder.

The syntax of the stored procedure is as follow:

sp_SSISCloneEnvironment
   @sourceFolder                = 'Source Folder Name'
  ,@sourceEnvironment           = 'Source Environment Name'
  ,@destinationFolder           = 'Destination Folder Name'
  ,@destinationEnvironment      = 'Destination Environment Name'
  ,@autoCreate                  = 1 --Auto Create Destination
  ,@printScript                 = 1 --Specifies that Create Script should be output instead of actual execution
  ,@decryptSensitiveInScript    = 1 --Specifies that the sensitive values should be decrypted in the create script

Currently when cloning the environment variables the destination environment must be empty if script is not being generated and the procedure is running in the non-interactive mode.

The generated script is also easily reusable as there are two variables in the beginning for specification of the destination folder and environment. By simple modification of those variables the script will generate the variables different environments.

Parameters

The procedure has several parameters where some are required and some optional

The core parameters are @sourceFolder, @sourceEnvironment and @destinationFolder. The @destinationEnvornment, @autoCreate, @printScript and @decryptSensistiveInScript are optional.

@source Folder

Specifies the source folder where the source environment is located

@sourceEnvironment

Specifies the name of the source environment from within source folder to be scripted

@destinationFolder

Name of the destination folder to wich the environment varaibles should be clonned.

@destinationEnvironment

Name of the destination environment to which the varaibles should be conned. This parameter is optional and if not provided, then the name of the source environment is used.

@autoCreate

Specifies whether the destination foolde and destination environment should be automatically crated if they do not exist. If the script is being generated then a statement which checks existence of the folder and environment are included in the script and missing folder and/or environment is automatically created if needed by the script.

Default value is 1 = true

@printScript

Specifies whether a script should be printed into the output window. If yes, then you simply copy the script from the output window and you can apply it immediatelly on other SSIS Instance.

Default value = 0, this means that the script executes within the SSISDB catalog and automatically clnes the variables

@decryptSensitiveInScript

Specifeis whether sensitive values should be decrypted in the script.If yes, then the values are part of the script in plain-text form, howver they are marked sensitive and will be encrypted after applying the script.

If the parameter is 0 (Default), then the sensitive values are not scripted out and instead NULL value is being scripted out. User must then fill those missing values priorexecution of the script.

Sample Output

Below is sample script generated by the stored procedure when @printScript=1 and @decryptSensitiveInScript=1

RAISERROR(N'sp_SSISCloneEnvironment v0.20 (2016-10-11) (C) 2016 Pavel Pawlowski', 0, 0) WITH NOWAIT;
RAISERROR(N'===================================================================', 0, 0) WITH NOWAIT;

DECLARE @destinationFolder nvarchar(128) = N'TEST' --Specify Destination Folder Name
DECLARE @destinationEnvironment nvarchar(128) = N'ClonedEnvironment' --Specify Destination Environment Name

--Checking for destination folder existence
IF NOT EXISTS(SELECT 1 FROM [SSISDB].[catalog].[folders] WHERE [name] = @destinationFolder)
BEGIN
    RAISERROR(N'Creating missing Folder [%s]', 0, 0, @destinationFolder) WITH NOWAIT;
    EXEC [SSISDB].[catalog].[create_folder] @folder_name = @destinationFolder
END

--Checking for destination environment existence
IF NOT EXISTS(
    SELECT 1
    FROM [SSISDB].[catalog].[environments] e
    INNER JOIN [SSISDB].[catalog].[folders] f ON f.folder_id = e.folder_id
    WHERE f.[name] = @destinationFolder AND e.[name] = @destinationEnvironment
)
BEGIN
    RAISERROR(N'Creating missing Environment [%s]\[%s]', 0, 0, @destinationFolder, @destinationEnvironment) WITH NOWAIT
    EXEC [SSISDB].[catalog].[create_environment] @folder_name = @destinationFolder, @environment_name = @destinationEnvironment, @environment_description = N''
END

--Checking for variables existence in destination eivnironment
IF EXISTS (
    SELECT 1
    FROM [SSISDB].[catalog].[environment_variables] ev
    INNER JOIN [SSISDB].[catalog].[environments] e ON e.environment_id = ev.environment_id
    INNER JOIN [SSISDB].[catalog].[folders] f ON f.folder_id = e.folder_id
    WHERE
        f.name = @destinationFolder AND e.name = @destinationEnvironment
)
BEGIN
    RAISERROR(N'Destination Environment [%s]\[%s] is not empty. Clear all variables prior clonning environment.', 15, 2, @destinationFolder, @destinationEnvironment) WITH NOWAIT;
    RETURN;
END

--Environment variables creation
DECLARE @var sql_variant

RAISERROR(N'Creating variable [SSISDB]\[%s]\[%s]\[V1]', 0, 0, @destinationFolder, @destinationEnvironment) WITH NOWAIT;
SET @var = CONVERT(bit, N'1');
EXEC [SSISDB].[catalog].[create_environment_variable] @variable_name=N'V1', @data_type=N'Boolean', @sensitive=False, @folder_name=@destinationFolder, @environment_name=@destinationEnvironment, @value=@var, @description=N''

RAISERROR(N'Creating variable [SSISDB]\[%s]\[%s]\[V10]', 0, 0, @destinationFolder, @destinationEnvironment) WITH NOWAIT;
SET @var = CONVERT(sql_variant, N'This is string parameters');
EXEC [SSISDB].[catalog].[create_environment_variable] @variable_name=N'V10', @data_type=N'String', @sensitive=False, @folder_name=@destinationFolder, @environment_name=@destinationEnvironment, @value=@var, @description=N''

RAISERROR(N'Creating variable [SSISDB]\[%s]\[%s]\[V11]', 0, 0, @destinationFolder, @destinationEnvironment) WITH NOWAIT;
SET @var = CONVERT(sql_variant, N'This is sensitive string'); --SENSITIVE
EXEC [SSISDB].[catalog].[create_environment_variable] @variable_name=N'V11', @data_type=N'String', @sensitive=True, @folder_name=@destinationFolder, @environment_name=@destinationEnvironment, @value=@var, @description=N''

RAISERROR(N'Creating variable [SSISDB]\[%s]\[%s]\[V12]', 0, 0, @destinationFolder, @destinationEnvironment) WITH NOWAIT;
SET @var = CONVERT(datetime, N'2010-12-31T00:00:00'); --SENSITIVE
EXEC [SSISDB].[catalog].[create_environment_variable] @variable_name=N'V12', @data_type=N'DateTime', @sensitive=True, @folder_name=@destinationFolder, @environment_name=@destinationEnvironment, @value=@var, @description=N''

RAISERROR(N'Creating variable [SSISDB]\[%s]\[%s]\[V13]', 0, 0, @destinationFolder, @destinationEnvironment) WITH NOWAIT;
SET @var = CONVERT(decimal(28, 18), N'99.990000000000000000'); --SENSITIVE
EXEC [SSISDB].[catalog].[create_environment_variable] @variable_name=N'V13', @data_type=N'Decimal', @sensitive=True, @folder_name=@destinationFolder, @environment_name=@destinationEnvironment, @value=@var, @description=N''

RAISERROR(N'Creating variable [SSISDB]\[%s]\[%s]\[V14]', 0, 0, @destinationFolder, @destinationEnvironment) WITH NOWAIT;
SET @var = CONVERT(int, N'56'); --SENSITIVE
EXEC [SSISDB].[catalog].[create_environment_variable] @variable_name=N'V14', @data_type=N'Int32', @sensitive=True, @folder_name=@destinationFolder, @environment_name=@destinationEnvironment, @value=@var, @description=N''

RAISERROR(N'Creating variable [SSISDB]\[%s]\[%s]\[V2]', 0, 0, @destinationFolder, @destinationEnvironment) WITH NOWAIT;
SET @var = CONVERT(tinyint, N'5');
EXEC [SSISDB].[catalog].[create_environment_variable] @variable_name=N'V2', @data_type=N'Byte', @sensitive=False, @folder_name=@destinationFolder, @environment_name=@destinationEnvironment, @value=@var, @description=N''

RAISERROR(N'Creating variable [SSISDB]\[%s]\[%s]\[V3]', 0, 0, @destinationFolder, @destinationEnvironment) WITH NOWAIT;
SET @var = CONVERT(datetime, N'2016-01-01T00:00:00');
EXEC [SSISDB].[catalog].[create_environment_variable] @variable_name=N'V3', @data_type=N'DateTime', @sensitive=False, @folder_name=@destinationFolder, @environment_name=@destinationEnvironment, @value=@var, @description=N''

RAISERROR(N'Creating variable [SSISDB]\[%s]\[%s]\[V4]', 0, 0, @destinationFolder, @destinationEnvironment) WITH NOWAIT;
SET @var = CONVERT(decimal(28, 18), N'12.390000000000000000');
EXEC [SSISDB].[catalog].[create_environment_variable] @variable_name=N'V4', @data_type=N'Decimal', @sensitive=False, @folder_name=@destinationFolder, @environment_name=@destinationEnvironment, @value=@var, @description=N''

RAISERROR(N'Creating variable [SSISDB]\[%s]\[%s]\[V5]', 0, 0, @destinationFolder, @destinationEnvironment) WITH NOWAIT;
SET @var = CONVERT(float, N'156.987');
EXEC [SSISDB].[catalog].[create_environment_variable] @variable_name=N'V5', @data_type=N'Double', @sensitive=False, @folder_name=@destinationFolder, @environment_name=@destinationEnvironment, @value=@var, @description=N''

RAISERROR(N'Creating variable [SSISDB]\[%s]\[%s]\[V6]', 0, 0, @destinationFolder, @destinationEnvironment) WITH NOWAIT;
SET @var = CONVERT(int, N'123456');
EXEC [SSISDB].[catalog].[create_environment_variable] @variable_name=N'V6', @data_type=N'Int32', @sensitive=False, @folder_name=@destinationFolder, @environment_name=@destinationEnvironment, @value=@var, @description=N''

RAISERROR(N'Creating variable [SSISDB]\[%s]\[%s]\[V7]', 0, 0, @destinationFolder, @destinationEnvironment) WITH NOWAIT;
SET @var = CONVERT(bigint, N'987654321');
EXEC [SSISDB].[catalog].[create_environment_variable] @variable_name=N'V7', @data_type=N'Int64', @sensitive=False, @folder_name=@destinationFolder, @environment_name=@destinationEnvironment, @value=@var, @description=N''

RAISERROR(N'Creating variable [SSISDB]\[%s]\[%s]\[V8]', 0, 0, @destinationFolder, @destinationEnvironment) WITH NOWAIT;
SET @var = CONVERT(smallint, N'9');
EXEC [SSISDB].[catalog].[create_environment_variable] @variable_name=N'V8', @data_type=N'SByte', @sensitive=False, @folder_name=@destinationFolder, @environment_name=@destinationEnvironment, @value=@var, @description=N''

RAISERROR(N'Creating variable [SSISDB]\[%s]\[%s]\[V9]', 0, 0, @destinationFolder, @destinationEnvironment) WITH NOWAIT;
SET @var = CONVERT(float, N'56');
EXEC [SSISDB].[catalog].[create_environment_variable] @variable_name=N'V9', @data_type=N'Single', @sensitive=False, @folder_name=@destinationFolder, @environment_name=@destinationEnvironment, @value=@var, @description=N''

Parallel execution of child SQL Server Integration Services Packages using For Loop Containers

On mssqltips.com you can find my latest post Parallel execution of child SQL Server Integration Services Packages using For Loop Containers.

The post describes a very simple way how to parallelize execution of child packages in SSIS. There exists third party components for parallel execution, but sometimes they are costly and some time they do not work exactly as expected. The for loop containers allow us to implement it using purely using the building components and at no costs with exactly defined behavior.

Reading SharePoint Surveys and Lists using a SQL Server Integration Services Package – Updated

On www.mssqltips.com (Reading SharePoint Surveys and Lists using a SQL Server Integration Services SSIS Package) you can find an updated version of my original post Reading SharePoint List and Survey data using Integration Services package.

The updated version on mssqltips describes an easier way of reading the Surveys and Lists data with simplified use of URL protocol an more elegant way of final data extraction using the T-SQL XML methods.

Post also contains complete demo solution.

Manipulating SSIS packages using PowerShell

Probably you have come to situation when you have a SSIS project with higher count of packages and you need to add for example a parameter or variable to all or most of the packages.  Normally you have to open each package and add variable/parameter to all packages one by one and specify all the properties in each package.

Using the PowerShell will save you a lot of manual work and tons of clicks inside the SQL Server Data Tools (SSDT) or  Business Intelligence Development Studio (BIDS) as PowerShell will allow you to automate the manual work. It’s very easy to manipulate the packages by PowerShell as SSIS packages are pure XML Files and PowerShell has a good XML support.

For writing, testing and running PowerShell script I suggest you download and install PowerGUI which has great IntelliSense support and is probably best PowerShell editor available. Also I suggest you to install the Run AddOn which allows you to execute only selected part of script.

Also before you start executing the scripts, ensure that you have properly set ExecutionPolicy to allow script execution. You have to run it with elevated Administrator privileges.

Enable Local not signed Script Execution
Set-ExecutionPolicy RemoteSigned

Example how to manipulate SSIS using PowerShell

In this example we will manipulate SSIS 2012 packages and we will add a new parameter to the packages.

First thing you have to do is to retrieve list of SSIS package to be processed. This can be easily done by the Get-ChildItem cmdlet.

$files = Get-ChildItem "C:MySSISProjects*.dtsx"

Once we have the list of file to be processed we can start processing file by file using the foreach structure. In this example we will add a SSISTaskID package parameter.

Get List of all relevat SSIS Packages
$files = Get-ChildItem "C:MyProjectsMySSISProject*.dtsx"

#process file by file
foreach($file in $files)
{
    #get the content of SSIS package as XML
    $dts = [xml](Get-Content $file.FullName)

    #create XmlNamespaceManager
    $mng = [System.Xml.XmlNamespaceManager]($dts.NameTable)
    #add a DTS namespace to the XmlNamespaceManager
    $mng.AddNamespace("DTS", "www.microsoft.com/SqlServer/Dts")

    #use XPath query to get DTS:PackageParameters node
    $params = $dts.SelectSingleNode("/DTS:Executable/DTS:PackageParameters[1]", $mng)

    #use XPath query to get eventual existing SSISTaskID parameter
    $param = $dts.SelectSingleNode("/DTS:Executable/DTS:PackageParameters/DTS:PackageParameter[@DTS:ObjectName='SSISTaskID'][1]", $mng)

    if ($param -eq $null) #parameter does not exists
    {
        #Create New Package parameter with prefix DTS and correct namespace uri
        $param = $dts.CreateElement("DTS", "PackageParameter", "www.microsoft.com/SqlServer/Dts")

        $attr = $dts.CreateAttribute("DTS", "CreationName", "www.microsoft.com/SqlServer/Dts")
        $param.Attributes.Append($attr)

        #Parameter Data Type
        $attr = $dts.CreateAttribute("DTS", "DataType", "www.microsoft.com/SqlServer/Dts")
        $attr.Value = "3" #DataType = 3 is equal to integer
        $param.Attributes.Append($attr)

        ##Description
        $attr = $dts.CreateAttribute("DTS", "Description", "www.microsoft.com/SqlServer/Dts")
        $attr.Value = "This is a TaskID"
        $param.Attributes.Append($attr)

        #DTSID - unique GUID for created parameter
        $attr = $dts.CreateAttribute("DTS", "DTSID", "www.microsoft.com/SqlServer/Dts")
        $attr.Value = "{" + [System.Guid]::NewGuid().toString().ToUpper() + "}" #Each parameter has unique GUID in SSIS package, so let's generate one
        $param.Attributes.Append($attr)

        #parameter name
        $attr = $dts.CreateAttribute("DTS", "ObjectName", "www.microsoft.com/SqlServer/Dts")
        $attr.Value = "SSISTaskID"
        $param.Attributes.Append($attr)

        #Parameter Value property - setting the parameter value
        $paramValue = $dts.CreateElement("DTS", "Property", "www.microsoft.com/SqlServer/Dts");

        #setting attributes of Parameter Value Property
        $attr = $dts.CreateAttribute("DTS", "DataType", "www.microsoft.com/SqlServer/Dts")
        $attr.Value = "3"
        $paramValue.Attributes.Append($attr)

        $attr = $dts.CreateAttribute("DTS", "Name", "www.microsoft.com/SqlServer/Dts")
        $attr.Value = "ParameterValue"
        $paramValue.Attributes.Append($attr)

        #Set the value of the ParameterValue property
        $paramValue.InnerText = "0"

        #add the property to the Parameter
        $param.AppendChild($paramValue)     

        #Add the Parameter to the Params collection
        $params.AppendChild($param)
    }       

    ################################################################################################
    #  Once the Parameter is created it is time to write the package back to disk
    ################################################################################################

    #Create XmlWriterSettings as we want to format the SSIS package properly
    [System.Xml.XmlWriterSettings] $settings = New-Object -TypeName System.Xml.XmlWriterSettings

    $settings.Indent = $true #Indent child nodes
    $settings.NewLineOnAttributes = $true #put each attribude on separate line

    #Create XmlWriter with appropriate settings and path to overwrite the original package
    [System.Xml.XmlWriter]$writer = [System.Xml.XmlWriter]::Create($file.FullName, $settings)

    #Save the package using the XmlWriter
    $dts.Save($writer)

    #Close the writer
    $writer.Close()
}
In the script we are using XPath query to get relevant Parameter Nodes. This can be easily used for locating whatever node in the XML source is necessary. For more details related to XPath you can take a look  XPath Reference on MSDN. I our example we take first DTS:PackageParameters node under the DTS:Executable node. For correct querying we have to use XmlNameSpaceManager as all the nodes in SSIS Package are prefixed with DTS name space. For checking whether the parameter we would like to add exists or not we again use XPath with appropriate filters to find it by Name. Then if the parameter doesn't exists, we create a new one. What attributes and child nodes are necessary for such parameter you find out easy. Create the parameter using BIDS or SSDT in one of the SSIS packages, then take a look into the source code of the package and you will be able to find all the information necessary. For example in our case the parameter node in the source XML looks as below:
<DTS:PackageParameter
    DTS:CreationName=""
    DTS:DataType="3"
    DTS:Description="This is a TaskID"
    DTS:DTSID="{3252C760-114A-4E8F-86EB-D3E6BAACA0E4}"
    DTS:ObjectName="SSISTaskID">
    <DTS:Property
    DTS:DataType="3"
    DTS:Name="ParameterValue">0</DTS:Property>
</DTS:PackageParameter>

So we had to create a PackageParameterNode with CreationName, DataType, Description, DTSID and ObjectName attributes and also with child node Property, which represents default value of the parameter.

As each parameter, variable or whatever part in SSIS has it's own unique DTSID property, which is GUID, we have used the [System.Guid]::NewGuid() method to generate unique DTSID for our parameter.

Finally once the changes into the SSIS package are applied, it is necessary to write it back to the file system. By default the source of the SSIS package is indented and and each attribute is written on separate line. SSIS packages are written in that way to be more human readable and allow an easy processing and comparison by versioning systems.

To achieve the same formatting we have to create and use instance of the XmlWriter class with appropriate XmlWriterSettings. As you can see from the script we set Indent and NewLineOnAttributes properties to true.

Once the writer is constructed, we can write the package back to the file system. It is also important to close the writer once the saving is done otherwise you will keep open handles to the processed files.

In the example we are also overwriting the original package as we specify the $file.FullName as path for the XmlWriter class. If we want, we can provide whatever name for the package and save it under different name. In case we would like to add a "_modified" suffix to the file name, we can use:

System.IO.Path]::Combine($file.DirectoryName, $file.BaseName + "_modified") + $file.Extension

Conclusion

As we can see from the example, the SSIS manipulation using PowerShell is quite easy and after a small training with writing this modification also very quick and will save you a lot of manual work if you have to modify a higher count of packages. You can alter the above script slightly to do nearly whatever modification is necessary.

This example was done on SSIS 2012 package source, but can be relatively easy applied also on SSIS 2005 and SSI 2005 although the XML source of those packages are not so easy readable as the source of SSIS 2012.

Installing Custom SSIS Components into GAC Using PowerShell

In one of my previous posts SSIS 2008 Columns To XML Data Flow Transformation I have presented a custom SSIS Data Flow Transformation.

As mentioned in the post, to be able to use the component, it has to be put into PipelineComponents folder of the SSIS Installation (For SQL Server 2008 common location is C:Program FilesMicrosoft SQL Server100DTSPipelineComponents) and also it needs to be installed into GAC(Global Assembly Cache). The location in the PipelineComponents is important for the BIDS designer and the GAC installation is important for SSIS execution.

Placing the component assembly into the PipelineComponents folder is very straightforward as you simply copy/past the assembly .dll file into this directory.

On the other side, installation into the GAC can be a little bit tricky and depend on the OS and .Net Framework version for which the assembly is built.

Components for SQL Server 2005 and 2008 (.Net < 4.0)

If the component is build for SQL Server 2005 or 2008, then yo use .Net framework lower than 4.0 and the installation relatively easy.

Installation on Windows Server 2003 and Windows XP

Installation of the .Net 2.0 or .Net 3.5 assemblies on the Windows Server or Windows XP is relatively easy as the GAC is located in C:Windowsassembly directory and can be easily managed by the windows Explorer. Simply navigate into this directory and Drag-Drop the assembly .dll file(s) here.

<img class="alignnone size-full wp-image-634" title="Sever 2003 GAC (.Net

If you need to uninstall the assembly, simply find your assembly in the GAC, right-click on it and choose Uninstall. You will need to uninstall the assembly if you would like to deploy an updated version (eg. because of bug fix or for whatever reason). In that case you have to uninstall such assembly first and the install it again.

Installation on Windows Server 2008, Vista ans Windows 7

Installation of assembly into GAC on the Windows Server 2008, Vista and Windows 7 can be a little bit trickier. However the assemtrickierbly has the same location as on Windows Server 2003 and Windows XP (C:Windowsassembly), those systems are missing the explorer integration for Installation purposes (you cannot Drag-Drop assemblies into that directory).

For that purpose you can use the gacutil.exe but this is not part of the standard installation. You have to install the Windows SDK. Once installed, then this utility is located in C:Program Files (x86)Microsoft SDKsWindowsv7.0ABin directory. You do not need to install the SDK on all the machines where you need to deploy the assembly. It is enough to copy the gacutil.exe and gacutil.exe.config files to the target machines and use it to install/un-install the assembly. You have to execute it from command prompt with administrative privileges, so in case of UAC enabled, you have to run the command prompt AS Administrator.

To install use the gacutil.exe with the /i switch:

gacutil.exe /i "C:Program FilesMicrosoft SQL Server100DTSTE.SSIS.DataFlow.dll"

To list all the assemblies in GAC you can use /l switch:

gacutil.exe /l

Eventually you can put assembly name filter after the /l switch (it will list all installed versions of the assembly, as GAC support multiple versions of the same assembly to be installed at the same time):

gacutil.exe /l TE.SSIS.DataFlow

To uninstall an assembly from GAC use the /u switch:

gacutil.exe /u TE.SSIS.DataFlow

Components for SQL Server 2012 (.Net  4.0) and .Net 4.0 GAC Structure

With SQL Server 2012 the things start to be a little more tricky than with previous versions as components needs to be compiled under .Net framework 4.0.

In .Net 4.0 the GAC location has been changed and is located under C:WindowsMicrosoft.NETassembly directory.

As we can see, the structure has changed and there are separate directories for each platform. When building the components for SSIS we build them for MSIL (as it is platform independed and allow us to run the packages in both x32 and x64 runtime). In fact the structure is the same as for c:windowsassembly, but for the c:windowsassembly it is hidden in explorer. If you list the c:windowsassembly directory by dir command, you should see the same three directories on x64 system.

Each assembly has another directory in the GAC corresponding to the assembly name and under this directory there are directories for each version of the assembly and are named using the assembly strong name. Then  under this strong name directory are located the assembly .dlls

Installing .Net 4.0 assembly into GAC

As mentioned above, the GAC location and structure has changed in .Net 4.0. Also it is not possible to use the tools for .Net 3.5 and lower (I men gacutil.exe for older framework) and for security reason, you cannot also use simply Copy-Paste into GAC directory as it was for .Net < 4.0 on Server 2003 and Windows XP.

Again in you install Windows SDK and go through the directory structure, you will find tools for .Net 4.0 under the C:Program Files (x86)Microsoft SDKsWindowsv7.0ABinNETFX 4.0 Tools

In this directory you will find also the gacutil.exe for .Net 4.0. I was able to use it and install the assembly into GAC without problems on Windows 7 in the same way as it was mentioned above.

But when I try to copy it and use it on Windows Server 2008, I was not able to get the gacutil.exe for .net 40 working on it. gacutil.exe only prints a copyright information and that’s all.

 PowerShell the ultimate GAC installation solution

As I was not able to install the assemblies using the gacutil.exe I was starting to search for alternate solution of GAC installation and found the PowerShell.

You are able to install the assemblies to GAC on all above mentioned systems using a simple PowerShell Script.  For this purposes PowerShell will utilize System.EnterpriseServices.Internal.Publishh class which is able to install and uninstall the assemblies from GAC.

Only note to the Publish class. When you use it and make some typo or something, the GacInstall and GacRemove methods do not print any error message. So you have to be careful when typing the paths etc. To verify that the assembly was successfully installed /uninstalled to/ from GAC, simply browse to the GAC directory using Explorer and search for your assembly.

Install script we will use GacInstall method of the Publish class.

#Load System.EnterpriseServices assembly as it contain classes to handle GAC
[Reflection.Assembly]::LoadWithPartialName("System.EnterpriseServices")

#Create instance of Publish class which can handle GAC Installation and/or removal
[System.EnterpriseServices.Internal.Publish] $publish = new-object System.EnterpriseServices.Internal.Publish;

#Install dll into GAC using GacInstall method (Provide full path to the assembly)
$publish.GacInstall("C:Program FilesMicrosoft SQL Server110DTSTE.SSIS.DataFlow.dlll");

To uninstall an assembly you can use the GacRemove method of the Publish class. When uninstalling, you have to provide the complete path to the assembly dll.

#Remove from GAC using GacRemove method (Provide full path to the assembly in GAC)
$publish.GacRemove("C:WindowsMicrosoft.NETassemblyGAC_MSILTE.SSIS.DataFlowv4.0_1.0.0.0__0eedace497e8d607TE.SSIS.DataFlow.dll")

You can save the script into a script file e.g. GACInstall.ps1 and execute it from command line:

powershell.exe -noprofile -executionpolicy RemoteSigned -file c:scriptsGACInstall.ps1

Alternatively you can run the PowerShell console and run the command by command. Again PowerShell needs to be executed with Administrative privileges so take UAC in mind.

If you would like to use the PowerShell ISE (Integrated Scripting Environment) and execute the script form there, don’t forget set the Execution policy appropriately:

#Enable Local not signed Script Execution
Set-ExecutionPolicy RemoteSigned;

If you want to use the ISE also on Windows Server 2008, you have to enable that feature on the server first, as the PowerShell ISE is not installed and enabled by default on Windows Server 2008. So go to Server Manager,  choose Add Features and add the PowerShell ISE Feature.

Using the PowerShell, you are independed of any tools like gacutil.exe etc. and you are able to install whatever assembly on whatever system which has PowerShell available.

Hope this post will help you saving troubles when deploying custom SSIS packages to server.

SSIS 2008 Columns To XML Data Flow Transformation

This article represents a custom components for transformation of columns inside SSIS Data Flow into XML.

If you are writing ETL processes using SSIS, you many times comes to situation, when you need log errors or other problems which can occur during ETL process. An example can be a failure of data conversion during the ETL process. In that situation you mostly would like to know that record exactly caused that error and log such conversion errors into particular error table.

Problem occurs when you have a lot of tables and want to see what data were converted and caused that particular error. As SSIS requires that the sources and destinations needs to be strongly mapped and you have different sources with different structures, this leads to a situation where you have a lot of different error tables – generally one per the source structure at which an error can occur.

This situation can be easily solved by a custom Data Flow component which will convert all source columns into an XML. In that situation you can only have one Error Table, which will contain e.g. Error Code, Error Column, Description and an XML Field in which will be all the data of particular row which caused error encoded in XML Form. This rapidly simplifies error logging and also error log monitoring as you need to monitor only a single table.

So the SSIS Data Flow with the Custom Columns to XML Transformation could look like the one below.

Columns To Xml Data FLow

ColumnsToXML PropertiesColumnsToXML Input Columns

You can provide a SourceID and SourceName properties which are then part of the produced XML so you can easily identify the source. In the Input Columns you select columns you want to be written to the XML. You can also specify an OutpuAlias and the the column names written into the XML will be the one specified in the OutputAlias property.

The Log written using that component and the XML produced will look like the ones below.

ColumnsToXML Log

<row sourceID="1" sourceName="Test Data Conversion">
  <Column name="Name" id="235" lineageId="72">Joseph</Column>
  <Column name="ValueInt" id="236" lineageId="75">2</Column>
  <Column name="ValueDate" id="237" lineageId="78">2012/01/35</Column>
</row>

Using the .value method of XML data type we can easily querying necessary information from the log table for whatever source in the table. So for our sample scenario we would like to query the Name, ValueInt and ValueDate columns stored as XML. This can be easily achieved by below SQL query:

SELECT
    [RowID]
    ,[ErrorCode]
    ,[ErrorColumn]
    ,[ColumnsXMLData].value('data((/row/Column[@name="Name"])[1])', 'varchar(128)') AS Name
    ,[ColumnsXMLData].value('data((/row/Column[@name="ValueInt"])[1])', 'varchar(10)') AS ValueInt
    ,[ColumnsXMLData].value('data((/row/Column[@name="ValueDate"])[1])', 'varchar(10)') AS ValueDate
FROM [TestDB].[dbo].[ETLErrorLog]
WHERE [ColumnsXMLData].value('data((/row/@sourceID)[1])', 'int') = 1

As you can see from the samples above, you can create easily create single Error table for whatever ETL logging and simplify the logging rapidly as you#160; do not need to create the error tables with separate structures for each source.

ColumnsToXML Implementation

The ColumnsToXmlTransform is a custom implementation of the PipelineComponent. It is developed in C# for .NET framework 3.5 and uses Linq to XML for creating the XML output.

The component processes selected input columns, generates the XML and stores it in the output column called ColumnsXMLData.

Except the ColumsXMLDataSourceID and SourceName) to allow you to identify the source row source once it is written as XML into the database and simplifies querying for data coming from particular sources as showed above.

Once the component is built, it is necessary to install it into the Global Assembly Cache and to the PipelineComponents folder in the SQL Server Integration services installation path on the machine on which the SSIS using this component will be running.

To install it into a GAC you can use the gacutil.exe which is part of the Windows SDK.

Component is now available publicly with other components on GitHub as projects for SSIS 2008 – SSIS 2016.

If you run the development environment as with elevated Administrator privileges, the project contains Post Build events, which will install the assembly into the GAC (it assumes you have Windows SDK 7.0 installed – if you have newer version, modify the path to the gacutil.exe accordingly) and also copies the assembly into the codePipelineComponents/code folder of the default SQL Server Integration services installation. If you installation directory differ, please modify the paths in Post Build events accordingly.

Once you have compiled the code, installed in GAC and copied to the PipelineComponents folder, you can include the component to the data flow items palette. Right-click on the palette and select Choose Items

Choose Data Flow Transformation Items Pop-upChoose SSIS Data Flow Items

Once you select the component, it will appear on the toolbox and you can start using it.

Columns To XML On Palette

Once I will have more time, I will try to create an installer for the component. Anyway, any comments are welcome.

Reading SharePoint List and Survey data using Integration Services package

Sometimes you can come to situation when you need to read data from SharePoint and store them in database on SQL Server.

If you need to read a SharePoint List, then you can use SharePoint List Source and Destination components from CodePlex. There is a quite good presentation how to use it on MSDN site Extracting and Loading SharePoint Data in SQL Server Integration Services

These components work very well for the SharePoint List. Unfortunately you will have no success using them for reading data from the SharePoint Survey, although the structure of the data are nearly the same as for list. Simply these components doesn’t support Survey data. Also it can happen, that you cannot install any third party component you your server and therefore you cannot use the SharePoint List Source and Destination components.

In that case you can use a script which will extract the XML data out of the SharePoint and you have two possibilities how to handle the XML.

  1. You can save the XML file to some temporary location and then process the XML file using the XML Source in the Data Flow task to read data from it.
  2. You can process the XML inside the Script Component in the Data Flow task and direct records to corresponding output.

To retrieve the data you can use a below class snippet (C#), which you put into your Script Component or Scrip Task.

internal class SharePointDownloader
{
    public static XmlDocument GetSharePointListXml(string listUrl)
    {
        ServicePointManager.ServerCertificateValidationCallback = new RemoteCertificateValidationCallback(CertificateOverride.RemoteCertificateValidationCallback);
        WebResponse response;
        HttpWebRequest request = (HttpWebRequest)System.Net.HttpWebRequest.Create(listUrl);
        CookieContainer cookieContainer = new CookieContainer();

        request.CookieContainer = cookieContainer;
        request.Credentials = System.Net.CredentialCache.DefaultNetworkCredentials;

        response = request.GetResponse();
        string html;
        using (StreamReader sr = new StreamReader(response.GetResponseStream()))
        {
            html = sr.ReadToEnd();
            sr.Close();
        }

        XmlDocument doc = new XmlDocument();
        doc.LoadXml(html);

        XmlDocument destXml = new XmlDocument();
        XmlDeclaration dec = destXml.CreateXmlDeclaration("1.0", null, null);
        destXml.AppendChild(dec);
        XmlNode data = destXml.CreateElement("Data");
        destXml.AppendChild(data);

        foreach (XmlNode node in doc.GetElementsByTagName("z:row"))
        {
            XmlNode row = destXml.CreateElement("row");
            foreach (XmlAttribute attr in node.Attributes)
            {
                XmlAttribute da = destXml.CreateAttribute(attr.Name);
                da.Value = attr.Value;
                row.Attributes.Append(da);
            }
            data.AppendChild(row);
        }

        return destXml;
    }

    internal class CertificateOverride
    {
        public static bool RemoteCertificateValidationCallback(object sender, X509Certificate certificate, X509Chain chaing, SslPolicyErrors sslPolicyErrors)
        {
            return true;
        }
    }
}

As mentioned above put this class as part of the Script Component or Script Task and use the static method SharePointDownloader.GetSharePointListXml method to retrieve the XML data.

The function takes as argument an URL which points to the list/survey you need to download. You can retrieve this link from the .igy file which you get, when you select Export To Spreadsheet action in the SharePoint. Instead opening the file in excel you choose to save it and retrieve the URL from this file.

It is necessary to mention the assignation of the ServerCertificateValidationCallback property of the ServicePointManager class to a newly created internal class, which simply returns true. This is necessary to avoid problems with certificates.

The code snippet also uses the DefaultNetworkCredentials which represents credentials of the account under which the SSIS package will be executed. You can eventually provide other credentials if necessary.

One very important thing related to this snipped is, that in case of downloading Survey data, the account under which the code will be executed needs admin rights to the Survey in SharePoint, otherwise it will have no access to the complete list of responses in the survey.

So finally a complete sample of a Script Task could look similar to below code:

[System.AddIn.AddIn("ScriptMain", Version = "1.0", Publisher = "", Description = "")]
public partial class ScriptMain : Microsoft.SqlServer.Dts.Tasks.ScriptTask.VSTARTScriptObjectModelBase
{

    #region VSTA generated code
    enum ScriptResults
    {
        Success = Microsoft.SqlServer.Dts.Runtime.DTSExecResult.Success,
        Failure = Microsoft.SqlServer.Dts.Runtime.DTSExecResult.Failure
    };

    #endregion

    public void Main()
    {

        string url = "source data URL retrieved from the .igy file of the list/survey";
        string destFile = "c:tempfile.xml";
        try
        {
            XmlDocument data = SharePointDownloader.GetSharePointListXml(url);
            data.Save(destFile);
        }
        catch
        {
            Dts.TaskResult = (int)ScriptResults.Failure;
            return;
        }
        Dts.TaskResult = (int)ScriptResults.Success;
    }
}

internal class SharePointDownloader
{
    public static XmlDocument GetSharePointListXml(string listUrl)
    {
        ServicePointManager.ServerCertificateValidationCallback = new RemoteCertificateValidationCallback(CertificateOverride.RemoteCertificateValidationCallback);
        WebResponse response;
        HttpWebRequest request = (HttpWebRequest)System.Net.HttpWebRequest.Create(listUrl);
        CookieContainer cookieContainer = new CookieContainer();

        request.CookieContainer = cookieContainer;
        request.Credentials = System.Net.CredentialCache.DefaultNetworkCredentials;

        response = request.GetResponse();
        string html;
        using (StreamReader sr = new StreamReader(response.GetResponseStream()))
        {
            html = sr.ReadToEnd();
            sr.Close();
        }

        XmlDocument doc = new XmlDocument();
        doc.LoadXml(html);

        XmlDocument destXml = new XmlDocument();
        XmlDeclaration dec = destXml.CreateXmlDeclaration("1.0", null, null);
        destXml.AppendChild(dec);
        XmlNode data = destXml.CreateElement("Data");
        destXml.AppendChild(data);

        foreach (XmlNode node in doc.GetElementsByTagName("z:row"))
        {
            XmlNode row = destXml.CreateElement("row");
            foreach (XmlAttribute attr in node.Attributes)
            {
                XmlAttribute da = destXml.CreateAttribute(attr.Name);
                da.Value = attr.Value;
                row.Attributes.Append(da);
            }
            data.AppendChild(row);
        }

        return destXml;
    }

    internal class CertificateOverride
    {
        public static bool RemoteCertificateValidationCallback(object sender, X509Certificate certificate, X509Chain chaing, SslPolicyErrors sslPolicyErrors)
        {
            return true;
        }
    }
}

Once you save the data to a temporary destination, you can connect to the xml file using the XML Source in the Data Flow Task. What you will need is to generate the XSD schema from the XML source and keep that XSD schema for future use as in case of any other XML file which needs to be imported by SSIS.

If you would like to process the XML in the Script component, again you simply put the code inside the Script component, retrieve the XML and then go through the XML programmatically and direct the data to appropriate output of the script component.

Of course you can make some fine tuning for the script component to avoid double processing of the file use the core of the GetSharePointListXML and redirect the data directly to and output of the script component when processing the nodes in that part.